3 Easy Seed Germination Methods
Getting your plants to start out it always the first obstacle. I’ve had my share of annoyances, especially on older seeds, and made this to help you with some seed germination tips to get your plants started right.
{{ This post contains affiliate link }}
What are Seeds?

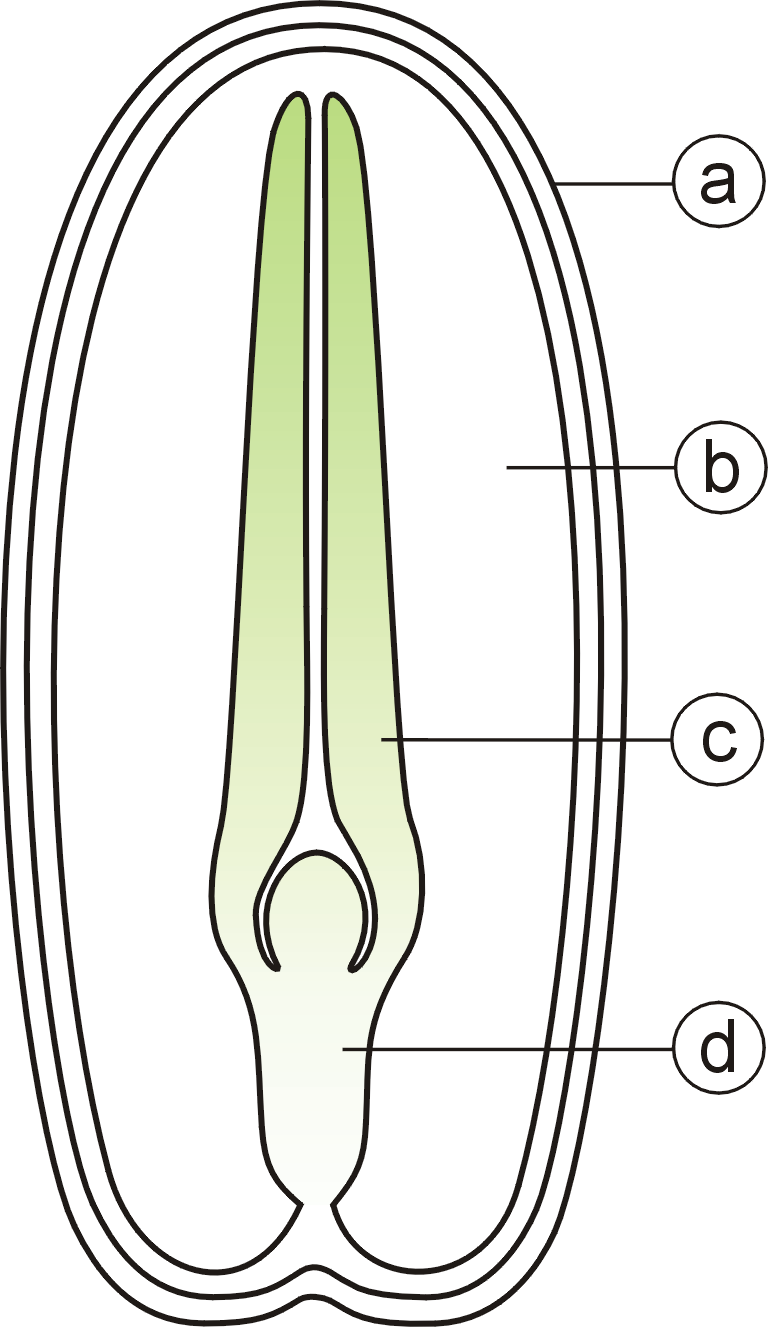
Seeds are the way most garden plants reproduce. They are made by a capable, mature plant that can basically pre-package itself in a tiny way that can then be released into the world to reproduce. Most seeds we deal with when gardening consist of:
- The seed coat – The hard, outer shell of the seed
- Endosperm – This provides sugars and fats to the seed to power development before it gets the ability to make its own food from light and CO2
- Cotyledons, or seed leaves – These are ready-formed leaves that unfurl as the plant breaks the surface. They provide the plant the ability to start making its own food once they have sufficient light
- The hypocotyl, or the embryo – this is the genetic payload of the plant and will develop into the stem and the rest of the plant.
And while that merely scratches the surface, it leads us to our next point which is…
What Do Seeds Need?
Since the seed first needs to know it’s time to grow, most crop seeds just need water. This allows certain chemical reactions within the seed to happen which lead to the embryo growing. Additionally, water sometimes helps to soften or break the seed coat.
Next, since plants need oxygen to metabolize the stored food source, your seed will need air. Not a whole lot, but you can’t germinate seeds in stagnant water because it will cut off the air supply. You should soak your seeds a little bit to get the requisite water and its limited supply of dissolved oxygen in the seed, but soaking for more than a day can lead to killing the seed.
Finally, then just need to be able to expand. Don’t pack them in! A little loose dirt on top of them is all they really need when planted in soil-like materials.
So, we want a moist area with access to air that does not overly restricts the seed. Without any more explanation, let’s get on to the methods!
Method 1: Soil pots
This is what most people will tell you to do: Take a small bit of mildly nutritive potting mix, add a seed, and keep it moist. While this is popular, the big problems are usually in keeping it moist. Potting mix tends to dry out fast, so this necessitates a humidity dome or frequent moistening of the soil.
If you go this route, make sure that you keep the top of the soil damp. Generally this means checking in every 2 days.
For individual plants, I like to use these disposable peat pots. They eventually biodegrade, don’t cost much, and are the right size to start most plants.
If you want to start a bunch of plants, you would be better off using multi-pot systems, or seedling trays.
Method 2: Wicking system in peat pucks
I really love peat or coconut husk pucks for seed germination and getting plants going. They hold a little bit of moisture, don’t need a lot of fuss to balance pH like rockwool does, and are blessedly cheap and available. This system needs a wick tub and table, which you can purchase for small money, but if you only need a few plants germinated, you can easily make your own from:
- a storage container
- one or two take out containers or a smaller storage container
- a wick (paper towels, felt, burlap, etc)
- and some peat pucks.
To use this:
- Cut the drain holes in the container you’re using as a table
- Assemble the wick like the photo
- Add water
- Put the pucks on top to expand
You should be ready to add seeds in about an hour.
Make sure you keep water in the base and clean it monthly or you will risk getting a lot of mold.
Method 3: Seeds directly on a wick
If you intend to grow direct in a big pot, don’t want any starting media in your hydro setup, or just want to easily keep track of the viability of your seeds, this is the method for you. It’s a take on the old double plate method of seed germination, but I find it to be more convenient.
You need:
- a 3 inch net cup
- A container that will hold it up. I typically use 16 Oz containers for food, or keg cups. It’s fine if the net cup sinks in a bit, as long as it doesn’t touch the bottom. Large-mouth mason jars work great.
- A wick: paper towel, felt, burlap, etc.
Just Add the wick through the net cup, bunch up the wick so the seeds have a place to sit, pop the net cup in the container, add water, and put the seeds on top. You’ll want to move them to a warm, dark place to germinate. There should be enough air and water for a couple of weeks of germination if you cover it.
Tips for better seed germination
If you want to make the most of plant germination, make sure you do the following:
- Keep your seeds and eventual seedlings warm. You’re shooting for 80°F. Seedling heating pads are your friends.
- Humidity needs to be high if you’re starting your seeds in soil, peat, or coco. Use a humidity dome, or grab a seed starer kit with the tray, dome, and heater.
- Don’t pack your soil around the seed, just lightly cover
I hope this helped you and if you have any comments, suggestions, or want to ask any questions, please comment below, or contact us. Thanks for visiting!


1 Comment
Comments are closed.