
Continually growing plants indoors has its many challenges: Keeping the plant going for continual harvest, grow speeds, aesthetics, and maintaining a healthy grow environment. Growing the plant via the Mason Jar Kratky method can solve many of this issues, providing you fast growth in an attractive manner that you can easily keep going much longer than a usual growing season.
This post contains affiliate links. By using them to purchase any of the items listed, you support us at no additional cost to you. We only recommend products we would use, ourselves.
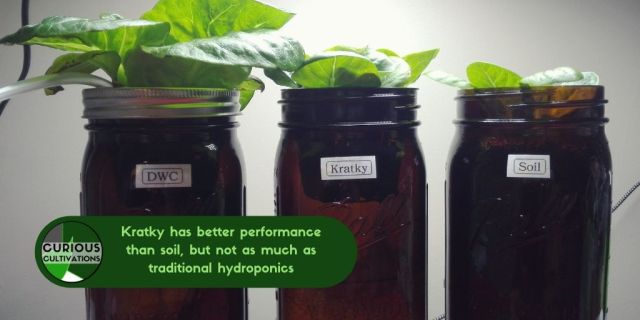
Why choose mason jar Kratky?
This technique is desirable for small, visible indoor grows for a few very good reasons:
- Pretty: It looks good while having high density
- More food: Hydro grows are much faster than grows in soil
- Easy to setup: The supplies are readily available at Walmart, Home Depot , or Amazon
- Easy to keep producing: maintenance comes down to adding water, harvesting, and adding fertilizer
What are the downsides?
Unfortunately, non-aerated hydroponics have some downsides to look out for:
- Prone to root rot: If you’re not careful, and hell, even if you are sometimes, you get infected roots and your plant suffers.
- Nutrient problems are common: Plants don’t like it when the nutrient level in the water is too acidic/basic, too strong, or too weak for a long time. These are easy to avoid with a pH tester and TDS meter, but it’s defeating the purpose of an easy grow system to deal with them.
- Fertilizer efficiency isn’t great: It’s far easier to continually replace fertilizer than to carefully manage intake as in traditional Kratky.
Start growing in mason jar Kratky

Gather your materials. You will need:
- Wide-mouth Mason jars, preferably the amber ones. If you use clear jars, make sure to paint them or cover them in something to prevent light in the root area (this prevents algae growth)
- 3in net pots – These hold the plant and fit on the jar’s lip
- Fertilizer – Our recommended hydro fertilizer is Veg Bloom Hard Water. It’s buffered, and works extremely well with most tap water. It’s also expensive. GenHydro has MaxiGrow, which is pretty great, but you will need to play with the concentration to get it right for your grow.
- 42mm Peat pucks. Or any size, really.
- A 1 gallon jug to hold nutrients
- Seeds or a plant to clone – Cloning is desirable for plants that support it. Basil, tomatoes, mint, and many other herbs clone easily.
- (optional) Hydrogen peroxide, 3%
- (optional) Root zone innoculant
At the end of this, you should be able to get a plant growing in a mason jar, and keep it going for a few months.
- Germinate a seed
Put the net cup in the jar, and add water until it comes up to 1/4″ above the bottom of the cup. Add your peat puck. Once it’s fully expanded, pop in your seeds. You can get more in-depth discussion of this in our article about germinating seeds.
If you are cloning, quickly take a cutting of the mother plant and pop the raw end in the peat puck. You can use cloning gel to speed the process.
Optionally, remove the net cup and add 5ml of 3% hydrogen peroxide to the water, if you are using a standard quart mason jar. 10ml for a half gallon jar. This kills most of the anaerobic bacteria and provides some additional dissolved oxygen in the water. Replace the net cup when done
- Let the plant set roots
Place a clear plastic cup over the top of the jar to conserve water and warmth. Put this in a warm spot and wait for the plant to sprout and get its first, true leaf.
If cloning, you are waiting for the first root to pop out of the puck
- Add fertilizer
In a mixing jug, mix your fertilizer to the minimum concentration recommended. Optionally add the 3% hydrogen peroxide at 30ml/gal, and the root zone innoculant. If you are using a TDS meter, we are shooting for about a 1.2mS reading, which is 600ppm with the American conversion factor.
Remove the humidity cover, pull out the net cup with your baby plant and dump the water. Fill with your nutrient solution to the bottom of the net cup.
Once filled, you can put the puck back in the net cup and put it in the light.
- Top up with water
Within the next few weeks, the water level will drop. If it drops below the net cup with no roots showing, top it up to the net cup level. If the roots are showing, top-up the nutrient liquid over the roots. Always make sure that the roots are in contact with liquid or your plant will die.
Once the water level gets below the 1/3 level, top up with water to the 2/3 level on the jar. Once it hits the 1/3 level again, discard everything and top up with fertilizer.
- Harvest and grow
Harvest your plant as the parts you want become available. Large plants don’t work well with this technique because they go through nutrients too quickly for you to keep up on.
Continue topping up at the 1/3 line to the 2/3 line, alternating with water and fertilizer as you go.
The growing environment
Keep your plants in good light, with fresh air. Temperatures should ideally be above 75F with humidity in the 40%-65% range. It’s a pretty good idea to keep a small garden thermometer in the area to make sure things are OK. . If your window doesn’t provide enough light or you want more growing space, a supplemental lighting source (A.K.A. a grow light) might be your best bet. Fans do improve performance, and a small tower fan will be the easiest to use in this environment.
Maintaining your grow
You can keep your grow happy by:
- Keep up on the watering. Make sure the plant has nutrient solution and that you’re keeping the rotation of water and fertilizer.
- Watch your plants for issues and react quickly.
- Maintain a reasonably sized plant. If you see the nutrient level drop more than half the jar per day, harvest some of the plant.
- Remember to regularly dump the solution and clean the jar. You can retain some of the old solution as an innoculant for the fresh nutrient solution if the plant was growing successfully.
Troubleshooting issues

Blackening leaves, light leaves on top, spotting,etc.
This is a pH issue. Your nutrient solution is probably acidic. The easiest way to fix this is to mix a new fertilizer solution and use less fertilizer. Alternatively, you can add 1/4tsp (1.25ml) of baking soda to a gallon of nutrient solution.

Yellowing leaves beginning on the bottom
This indicates a nutrient deficiency (technically, it’s a nitrogen deficiency). You can replace the nutrient solution with fertilizer solution to fix this. If this still continues, you may need to use more fertilizer.

Green growth on the roots
This is algae growth. It’s harmless to the plant, however, the dead algae will provide food for the root flora and will hasten root rot.
You can lightly rinse the roots with clean water, and make sure no light is getting in the root area. Continue to monitor this and change out the nutrient solution once per week for 2 weeks after the algae has been removed

Everything drooping
You let the water run out. if the roots are still pliable, quickly add water. If the roots are brittle and stiff, your plant is dead.

Dead or orange tips on the leaves
This is nutrient burn. Dilute your nutrient solution.
What plants grow well in mason jar hydroponics?
Many plants thrive growing this way. Plants that like lots of water, don’t weigh much, and are fast growing do the best. Some of my favorites:
- Lettuce
- Basil
- Chives
- Cilantro
- Parsley
- Spring onions
- Mint
Conclusions
I hope this gets you going on your adventures in indoor gardening. Let me know if you have any questions or have any tips to share!


