
Unless you purchase a full system, DIY LED panels, COBs, and single emitters require a driver to make them glow. LEDs have very non-linear electrical relationships which makes running them from traditional voltage sources problematic. Let’s dive in and figure out how to match an LED to a driver.
This post contains affiliate links. By using them to purchase any of the items listed, you support us at no additional cost to you. We only recommend products we would use, ourselves.
The TL;DR – How to quickly match an LED to a driver
Table of Contents
- Find the desired current for your panel, and the wattage. If you are missing wattage but have the voltage rating of your panel, multiply the voltage by the current (in Amps, not milliamps) to get the wattage. If you have more than one board, assume you will wire them in series and double the voltage and wattage, but keep the current the same.
Just because your LED has a max current listed, doesn’t mean you should use it. Many boards need additional cooling at max current. I tend to shoot for 20%-30% de-rating on the max current for better longevity, efficiency, and making it easier to find drivers.  Find an LED driver
- If you’re looking for quality, go to Meanwell’s selector page and enter in at least Constant Current, the closest current drive, and the wattage that comes closest, and perhaps one higher and lower. Select any other features you might want.
- You can perform a search for “LED Driver current” on Amazon as well to get the sketchier drivers, and then work your way through them to find something close.
- Sift through your options to find what meets your needs the best and open the data sheet or at least the product description page to double check the pertinent specifications. Try to maximize efficiency, and ensure the driver has the correct input voltage.
- Make sure the driver gets really close to your target current, and has wiggle room on the top and bottom end of required voltage.
LED Basics
As I said earlier, LEDs have highly nonlinear voltage vs current characteristics. Let’s take a look at a graph of a typical LED (in this case, a green indicator LED)

What you can see is that the LED will not conduct up until a voltage threshold is reached, then it will conduct from almost no light to max power within the span of about 1V. After that, the you exceed that maximum power output of the LED and it will burn out.
However, if we take a look at the luminous output vs current graph, you see something that better fits what we want:
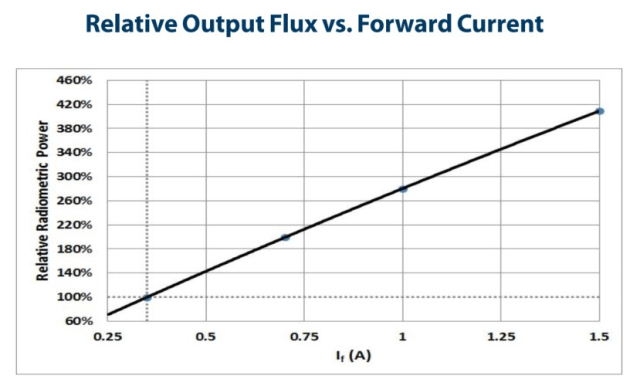
There is a very near linear relation between current and light output.
For these two reasons, LED drivers are always designed to limit current in one way or another. For the remainder of this, we’re only talking about constant current, or CC controllers.
Always? I hear people use constant voltage supplies to power LEDs all the time!
Before someone accuses me of being blind to the large number of voltage controlled LED drivers that exist (these are called constant voltage controllers, or CV), let me be clear: they exist and people have successfully used them on larger lights. However, I will posit these cases exist because:
- LED Strips exist and are specified for constant voltage supplies – each LED or group of LED limits current through a very simple but extremely inefficient circuit
- People buy big grow light panels, and manually tweak the voltage until they have the correct output without blowing them up – It works as long as the temperature doesn’t change enough to throw things off
- People buy big grow light panels, and the current limiter on the driver trips it into the safe range for the light – You’re using your CV power supply as a CC power supply anyway
- In the case of some inexpensive panels you’ll see, the voltage rating is so far below the maximum rating that current is limited simply by virtue of the IV curve.
Match an LED to a Driver
Overall, the process is simple enough. First, a few rules:
Your boards must act like a diode

The board conducts within a defined range of voltage, and get linearly brighter with more current up to a limit. Boards with fancy electronics on them that prevent that type of behavior or try to convert to another control method won’t work. As an example Growmau5’s Far Red Initiator Puck has an on-board driver and just needs 12V CV. Same goes more most LED light strips.
Series boards add voltages

If you have multiple boards in series, your current draw will stay the same, but the voltage needed to power them goes up
Boards in parallel split current… kinda

Before we begin, you should avoid parallel connections of LED boards. Don’t take it from me; Meanwell explains why you shouldn’t. However, the TL;DR is: Because of manufacturing tolerances, some of your LEDs might get driven harder than others, leading to a loss of life span and uneven lighting.
Many panels do this within themselves without much issue. This is because manufacturers will closely match diodes for voltage drop. When done correctly, you can tell because all the LEDs come up together as the forward current increases. You will see individual emitters come up on low-quality COBs/QBs.
The procedure
Determining a driver for your LEDs. Examples to follow.
- Determine the current you want to run your LEDs at
The manufacturer will supply the forward current range where this LED will operate as intended. They might specify a testing current, maximum current, and peak current. You want to operate between the testing current (which is chosen to make the specifications look the best) and the maximum. The peak current is how much you can push for very brief times, and are of no value in horticultural lighting.
Be aware that LED panels designed for horticultural use will give you this info without any digging. If you are trying to make your own from components, you will need to deduce some of this from the data sheets. In general, shoot to operate the LED at a range of the testing current to 80% of maximum when building your own light. - Find the min & max voltage needed to run at that drive level
Your LED will list a nominal voltage that it runs at. Horticultural lights tend to give you the absolute maximum values and test for that. Components and DIY kits might give you nominal values. Be sure to add a safety margin on either side of 10%
- Decide if you need any additional features
Do you need a dimmer? Arduino control? Built in timers? Waterproofing? Need to survive in humid environments? Some of those features add a lot of cost, and some don’t. Pick what you absolutely need.
- Decide how to break the system up
Assuming you used best practices and put the LEDs in series, figure out what you need for current and voltage ranges for the complete system. Larger systems might need to be broken up into several circuits because drivers can’t produce enough voltage, or your power draw might exceed your room’s single circuit breaker limit.
Additionally, many system require different control signals and paths may need to be driven at different current levels. Decide what each branch needs and go with that. - Find a driver(s)
Find a driver for each circuit. The driver needs to:
* Supply an acceptable amount of current
* Have a working voltage range that meets the need of your LEDs
* Use the correct power you have available. Wall-powered systems need to run in your country’s voltage range, and not trip your circuit breakers. Drivers you’ll power from a DC rail (as some smaller grows use), will need to take the correct DC input voltage.
The trick with driver manufacturers is that they list product by power ranges. You can find this out my multiplying your current requirements (in amps, not milliamps) and voltage. This gives you the power in Watts. You can then start looking at products rated for more than what you need. - Procure your parts
Small and simple systems can get away with using Amazon for drivers. They do carry a large number of inexpensive, fixed CC drivers in many voltage ranges. many are better than others, but I’ve had good luck with even the worst of them.
When you’re building a bigger system, you will probably be very picky about your drivers. That’s where electronics distributors are your best bet. Companies like Meanwell and EFore produce large ranges of drivers and you can easily find what you need.
These companies will sell through major distributors like Newark/Farnnel and Digikey
Reading power supply data sheets
Your data sheet will provide the info you need about your driver. I’m going to concentrate on Meanwell drivers, if only because they have a comprehensive line and reasonable data sheets. Many cheap drivers you find on Amazon or eBay don’t have a real data sheet, and you’ll have to guess the setting from the description, or ask the seller for the data sheet.

The important factors you need are:
- Input voltage – What kind of power does it take in. This will be either DC at a small, range, or AC in a larger range. The US uses 120VAC 60Hz for wall power and many places in the world use 240VAC 50Hz. Many drivers will accommodate all, but some only work in a single voltage range.
- Rated Wattage – This is the maximum amount of power this driver will put out. this is the max output voltage multiplied by the maximum output current. In practice, you will not get this maximum rating out of the driver because good engineers leave some head room in case something is out of spec slightly.
You should use this number as a general idea of what drivers to look for. Many power supplies will give you 1A of drive current, but if you are looking on eBay, you are likely to search for the wattage and current to get you started, - Rated current – Since we are concentrating on CC LED drivers, this will be the fixed or maximum output the driver can output. This number needs to be bellow the maximum your LED can handle. You can get a driver with more output and dim it back, but this can lead to accidentally exceeding the limits and causing permanent damage to the panel or driver.
- Voltage rating – This is how much voltage the supply can produce to get to your current limit. This number will be specified with a minimum and maximum. Your board’s voltage requirements +/-10% needs to fit in that range.
- Features – Features define the extras a driver can do. Common features include local dimming, remote dimming, status outputs, and on-board timers.
- Efficiency – Defines how much power gets converted to the LED and how much is lost as heat. Higher is better.
- IP Rating – This rates the Ingress Protection Rating, which simply specifies how secure the driver is to the environment. If it is specified, the first number defines the protection from solid objects, and the second specifies the protection from liquids:
| 1st Digit | Solid Object Protection | 2nd Digit | Liquid Protection |
| 0 | None | 0 | None |
| 1 | Protected against object more than 50mm in size | 1 | Protected from vertically dripping water |
| 2 | Protected against object more than 12.5mm in size | 2 | Protected from sprays tilted up to 15° |
| 3 | Protected against object more than 2.5mm in size | 3 | Protected from sprays tilted up to 60° |
| 4 | Protected against object more than 1mm in size | 4 | Protected from sprays |
| 5 | Protected against dust | 5 | Protected from low pressure, jetting water |
| 6 | Sealed | 6 | Protected from high pressure, jetting water |
| 7 | Can be immersed for 30 minutes | ||
| 8 | Can be continually immersed |
The common ones you will find are IP66 (water proof from sustained hosing), IP67 (waterproof even if submerged for a bit), IP5x (dust protected, but not water tight), and none (safe to assume it cannot take any water).
Project 1: A deal on a QB
The Scenario: You came into a deal on a QB at your grow shop and it didn’t come with a driver. The board is marked as “900ma-3000ma, 48V”. You just want to get it working and will stick this on a generic lamp timer.
The plan: This is a 144W (maximum) board (48V * 3A = 144W). It doesn’t have a heat sink, and the manufacturer name is in a language you don’t recognize. You should de-rate the power output by about 20% for about 115W. You should get at least a 120W power supply.
Finding the driver: Looking on Meanwell’s site, I find the closest current to 2.4A (3A * 80%), and 120W, which gives me the HLG-120H-48 as the first hit.
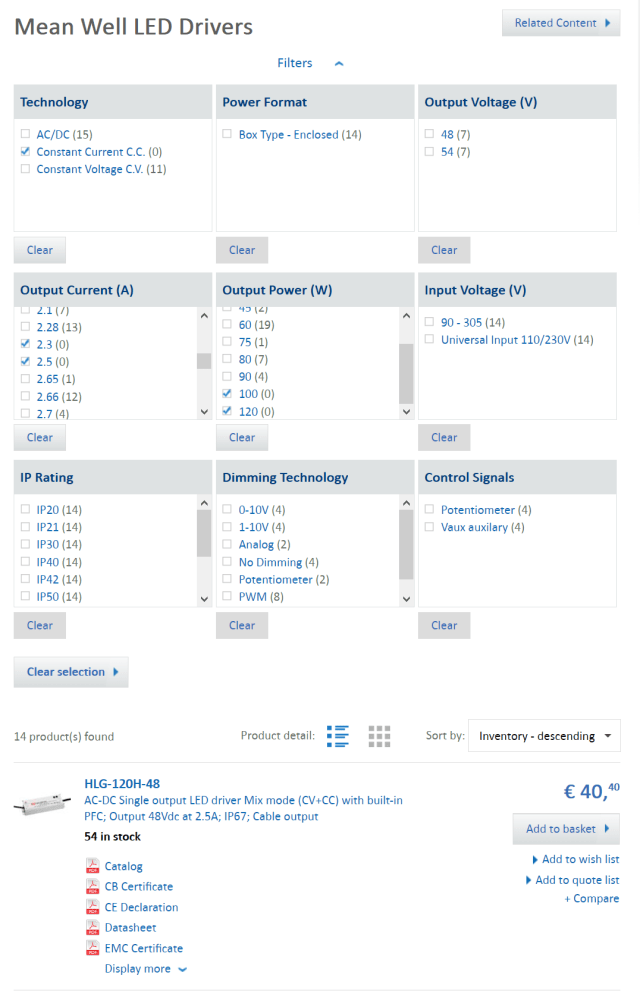
If we look at the datasheet for it, we see that the HLG-120H-48, gives us slightly more current than we need, and that 48V is exactly our needed voltage. While this will work, we run the risk of running the driver at CC mode because we’re maxing out.

However, right next to it, we see that the HLG-120H-54 is pretty much what we need and has plenty of head room for voltage.
Project 2: You need to replace the driver on a 25W panel


Popping in the .5A current and 25W into the Meanwell product selection page gives us a few options:
- IDLC-25-500 – A quick look around for sourcing shows that it’s not popular, and it’s $18… it seems to have a bunch of dimming functions I don’t care for either.
- Same problem on the IDPC-25-500, and it has no case, so that’s not going to be cost effective.
- The GSC25B-500 seems elegant, but Octopart saves me the trouble of thinking about it since it has lousy availability, it’s more expensive than others, and needs a power cord and connectors.
- The APC-25-500 fits the bill and is what I got. Sure, the APC-35-500 would have a better margin for error, but it’s more expensive and my dill doesn’t care. Octopart correctly gives me who has it, but the availability clued me in that you could also get it on Amazon.
Now, this driver has bare wires, so you need to also add a wall plug and connection to the panel. No big deal, but remember your accessories.
Project 3: You made your own Far-Red mono
The Scenario: Let’s say you’re me and made your own Mono board

The board only has 4x Luminus SST-10-FR 730nm LEDs, Luminus classifies these as 700mW LEDs at maximum efficiency, but can run at 3.9W (!) each at reduced efficiency and with appropriate heat sinking.
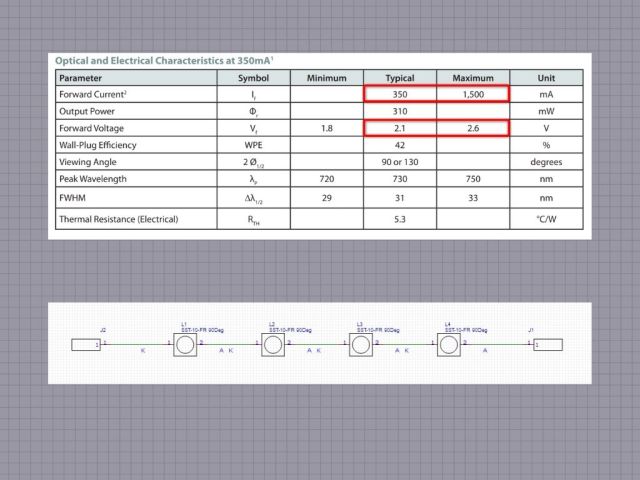
The plan: Match an LED to a driver. I’d like to drive this board towards the upper limits for testing, so roughly 1A. The drive voltage at that limit is about 2.3V, so we need ~1A at ~9.2V (4 * 2.3), which translates to a 10W driver.
Finding the driver: At 10W, fixed-current, I decided that paying a 30% premium for a better but larger driver on an untested light, wasn’t worth it. So, off to Amazon to get my self a 10W driver. While there are many available, the Chanzon 9W driver supplied 900mA at up to 10V, which should meet our needs. The light works OK, and is driven at 9.1V, still within the CC region. It also runs at 48°C, which might be getting hotter than I want to run them without airflow.


